Downloads
Category List
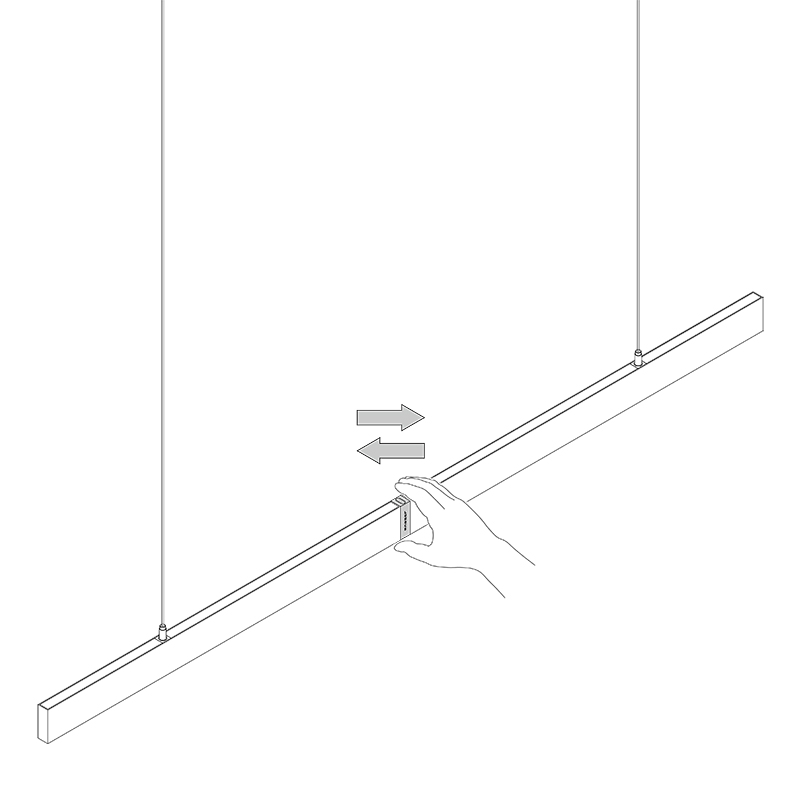
Feature Instruction v2.0
Technical Data
Manual
Technical Data
Manual
Technical Data
Manual
Drilling Template
Technical Data
Manual
Drilling Template
Technical Data
Manual
Flash Download Tool User Guide:
Preparation
1.1 Firmware upgrade requires the flash download tool and operating it on a Win7/Win10 computer.
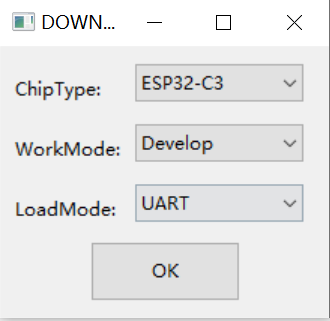
1.2 Open the Flash download tool, double-click the. exe file to enter the main interface of the tool, as shown in the following figure:
①. ChipType: Select ESP32-C3
②. WorkMode: Select Develop
③. LoadMode: Select UART
④. Click OK to proceed to the next step
Upgrade firmware for the remote control
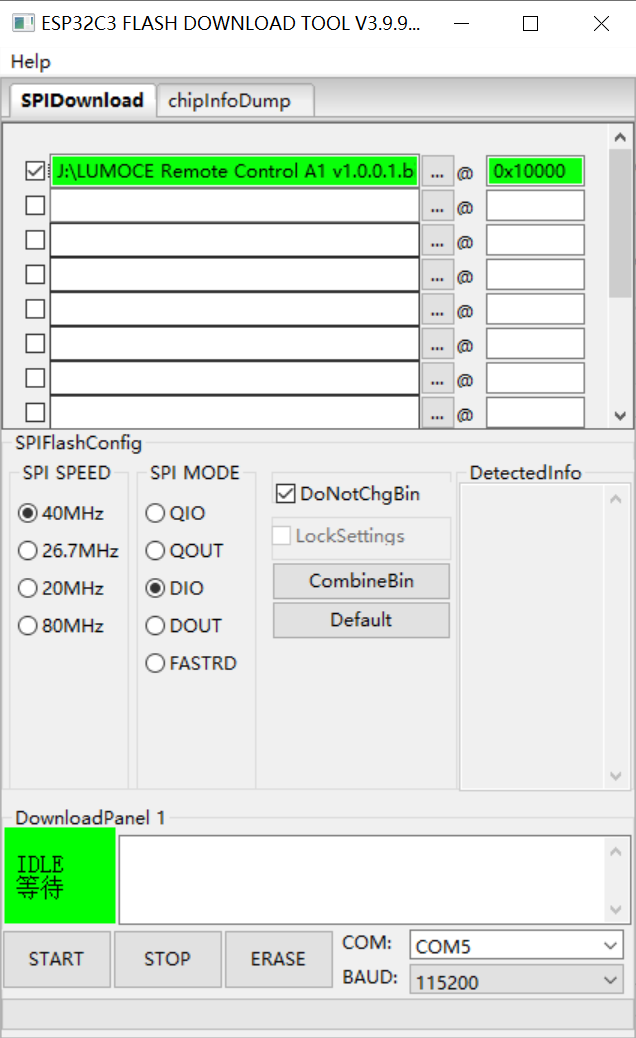
2.1 Enter the SPIDownload interface, fill in the remote control firmware file and the corresponding burning address 0x10000. Check the checkbox in front of the firmware file.
2.2 Insert the remote control into the computer via the Type-C data cable.
2.3 Select COM port recognized by the computer in the bottom right corner of the SPIDownload interface.
2.4 SPI SPEED and SPI MODE use default settings. BAUD select 115200.
2.5 Click START to start firmware burning, the firmware upgrade indicator will turn on, wait for burning to complete, the firmware upgrade indicator will turn off, and the remote control will automatically restart.
Upgrade firmware for the luminaire
3.1 Enter the SPIDownload interface, fill in the luminaire firmware file and the corresponding burning address 0x130000. Check the checkbox in front of the firmware file.

3.2 The remaining firmware burning steps are consistent with '2. Firmware upgrade of remote control'.
3.3 Ensure the luminaires which requiring firmware upgrades are online and belong to the same network group as the remote control.
3.4 After long pressing the firmware upgrade button for 3 seconds, the remote control will simultaneously upgrade the firmware of all paired online luminaires.
3.5 The firmware upgrade for the luminaire takes approximately 5 minutes. Upon successful completion, the firmware upgrade indicator will light up for 5 seconds, and the luminaire will automatically restart. If the upgrade fails, the firmware upgrade indicator will flash rapidly for 5 seconds, and the luminaire will remain unchanged.
Firmware upgrade fault recovery
If the remote control firmware is incorrect and cannot be used due to certain reasons, such as burning failure, firmware erasure, etc., the complete firmware package can be burned to recovery.
4.1 Enter the SPIDownload interface, fill in the remote control firmware file and the corresponding burning address. Check the checkbox in front of the firmware file.

①. bootloader.bin:0x0
②. partition-table.bin: 0x8000
③. LUMOCE Remote Control A1 v1.0.0.1.bin: 0x10000
4.2 The remaining firmware burning steps are consistent with '2. Firmware upgrade of remote control'.
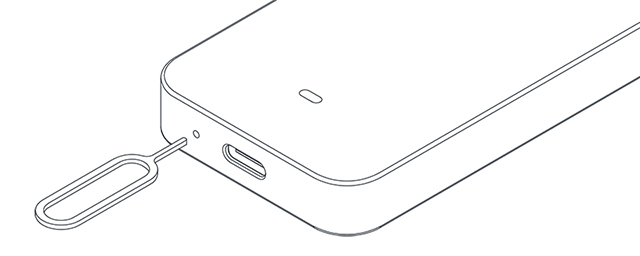
4.3 If the remote control cannot automatically restart after burning, you can use a card fetching pin (self-provided) to press the reset button to restart manually.
Luminaire v2.0.0.2 Version Description:
Switch lighting scenes by remote control is already available.
Short press the firmware upgrade button: upper lighting overdrive 150% brightness, lower lighting overdrive 150% brightness, dual lightings 100% brightness.
Short press the pairing button: dual lightings 100% brightness, dual lightings 50% brightness, dual lightings 10% brightness.
Short press the sensor switch button: 3350K color temperature, 4000K color temperature, 2700K color temperature.
Note: The luminaire firmware v2.0.0.2 needs to be used in conjunction with the remote control firmware v1.0.0.2.
Luminaire v2.0.0.1 Version Description:
Support LUMOCE luminaire remote control A1
LUMOCE luminaire remote control A1 can be used to control all lighting effects of the luminaire , switch the gesture sensor of the luminaire , and upgrade the firmware of the luminaire.
Support synchronous lighting status between multiple luminaires
Multiple lumianires can be networked, and after networking as a group, whether using gesture dimming or remote control dimming, the luminaires in the same network group will synchronize the dimming gradient process and results.
Support saving lighting state
The luminaire will save the lighting state 15 seconds before power off, in order to restore the lighting state after power on again.
Support overdrive state
①. Normal state: The maximum brightness of both the upper and lower lighting is limited to 100%.
②. Overdrive state: The maximum brightness of one lighting will increase from 100% to 150%, which is the overdrive channel. The brightness of the another lighting will be limited to 10%, which is the normal channel.
③. Entering overdrive state: In the normal state, when the brightness of one lighting is 10% and the other lighting brightness is 100%, by using the linkage dimming gesture, or the linkage dimming button on the remote control, to increase the brightness of the 100% side of lighting, the maximum limit of this channel's brightness will be raised from 100% to 150% to enter the overdrive state.
④. Exiting overdrive state: In overdrive state, when the brightness of one lighting is 10% and the other lighting is 101%, by using the linked dimming gesture, or the linked dimming button on the remote control, to reduce the brightness of the 101% side of lighting, the maximum limit of this channel's brightness will be reduced from 150% to 100% to exit the overdrive state.
⑤. Only through the linkage dimming gesture can make the luminaire enter or exit the overdrive state by gesture control on luminaire.
⑥. The luminaire will not save any lighting states in overdrive state. When the power is turned off and the light is turned on again, the luminaire will restore the last saved lighting state 15 seconds before entering the overdrive state.
Optimize dimming algorithm
5.1 Color temperature compensation mechanism
①. In the overdrive state, use color temperature compensation mechanism to increase the brightness of the overdrive channel, rather than directly increasing the power of the LEDs. By using color temperature compensation algorithm, ensure the safe increase of brightness in the overdrive channel within the power range of LEDs.
②. In the overdrive state, the global CCT adjustment range will be reduced. Based on the different brightness, the luminaire will calculate the global CCT adjustment range in real time according to the color temperature compensation mechanism.
5.2 Power compensation mechanism
Due to the characteristics of LEDs, the brightness varies slightly at different color temperatures. When adjusting the color temperature, the luminaire will automatically operate a power compensation mechanism to ensure that the brightness of the LEDs remains consistent at different color temperatures.
5.3 PWM frequency and resolution optimization
①. High frequency PWM dimming: optimizing the PWM frequency to an ultra-high frequency of about 20kHz, combined with an integrated inductor, can avoid slight flicker at low brightness and eliminate high-frequency whistling noise at low brightness.
②. Professional PWM resolution: increasing the PWM resolution to 4096 levels of 12 bits can provide delicate and smooth dimming effects, pushing the dimming accuracy to professional level.
Luminaire reset and pairing enable
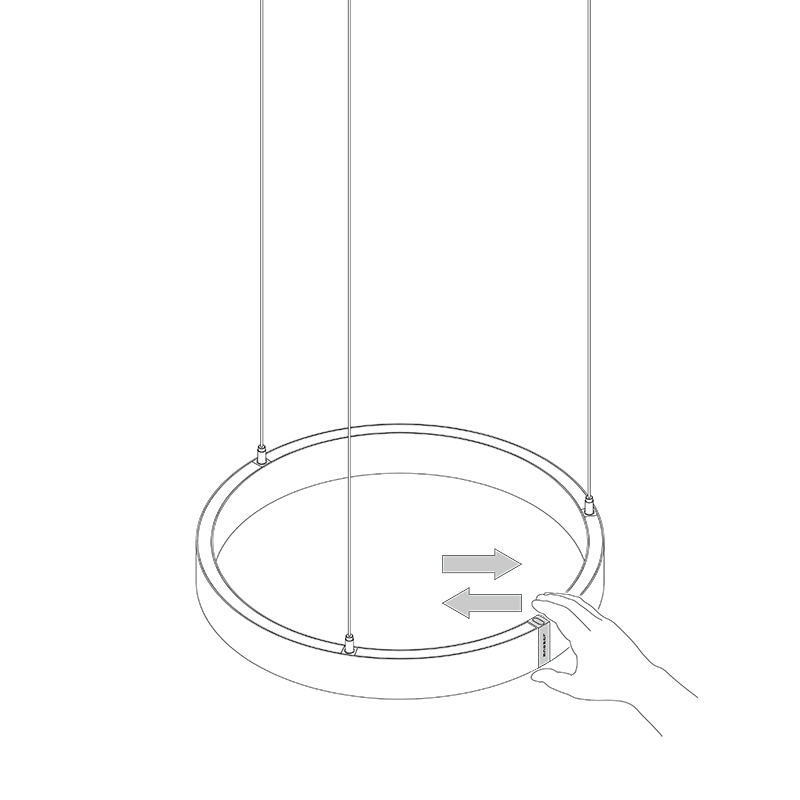
In the state when both the upper and lower lightings are turned on, within 5 seconds, hold your hand keeping in C-shape and swing twice on the upper and lower sensing surfaces to turn off and then turn on both the upper and lower lightings at the same time. The lightings flash 3 times, the luminaire clears existing pairing information, restarts and resets the lighting state, and enters the pairing state, waiting for other luminaires or the remote control to pair.
①. When the luminaire enables pairing, there is a 30 seconds pairing time window. Please complete the pairing within this period.
②. When successful pairing, the light flashes once to indicate successful pairing.
③. The luminaire can pair with either the remote control or orther luminaires. The control system supports multi-luminaire networking, single-luminaire-single-remote networking, multi-luminaire-single-remote networking, single-luminaire-multi-remote networking, and multi-luminaire-multi-remote networking.
Remote Control v1.0.0.2 Version Description:
Switch lighting scenes by remote control is already available.
Add remote control commands: short press the firmware upgrade button, short press the pairing button, and short press the sensor switch button to support the switching of lighting scenes on the luminaire.
Note: The remote control firmware v1.0.0.2 needs to be used in conjunction with luminaire firmware v2.0.0.2.
Remote Control v1.0.0.1 Version Description:
Pairing and networking group
1.1 Pairing
①. Short press the pairing button to check the connection status. If the remote control is paired with any luminaire and at least one luminaire is online, the pairing indicator will light up. If the remote control is paired with any luminaire and the luminaire is offline, the pairing indicator will flash rapidly for 5 seconds. If the remote control is not paired with any luminaire, the pairing indicator will not light up.
②. After long pressing the pairing button for 3 seconds, the remote control clears existing pairing information and enters pairing mode, the pairing indicator starts flashing to wait for the luminaire to pair.
③. In the state when both the upper and lower lightings are turned on, within 5 seconds, hold your hand keeping in C-shape and swing twice on the upper and lower sensing surfaces to turn off and then turn on both the upper and lower lightings at the same time. The lightings flash 3 times, the luminaire clears existing pairing information, restarts and resets the lighting state, and enters the pairing state, waiting for other luminaires or the remote control to pair.
1.2 Networking group
①. There is a 30 second pairing time for both the remote control and the luminaire in pairing state, during which successfully paired devices will automatically form the same network.
②. If different network groups are required, only devices that need to form the same network should be paired in one pairing time, and devices of other networks should be paired after 30 seconds.
③. The remote control can only pair with luminaire. The control system supports multi-luminaire networking, single-luminaire-single-remote networking, multi-luminaire-single-remote networking, single-luminaire-multi-remote networking, and multi-luminaire-multi-remote networking.
④. A maximum of 10 devices can be paired within the same network group. The number of paired devices may vary depending on the firmware version.
Button dimming control
The button dimming control on the remote control is consistent with the gesture sensing dimming control on the luminaire, which can achieve all lighting control on the luminaire.
2.1 Light on and off
①. Short press the corresponding upper or lower lighting switch button to control the on/off status of each lighting independently.
②. Press and release the switch button within 1 second, recognized as a short press.
③. It's not support long press for the switch buttion.
2.2 Brightness adjustment
①. Short press the brightness adjustment button corresponding to the lighting to adjust the brightness by 10% per press.
②. Long press the brightness adjustment button corresponding to the lighting to adjust the brightness continuously at a speed of 20%/s.
③. Press and release the brightness adjustment button within 1 second, recognized as a short press.Press the button for more than 1 second will be recognized as long press start, and then release the button will be recognized as long press end.
2.3 Global CCT adjustment
①. Short press the global CCT adjustment button to synchronously adjust the color temperature of the upper and lower lightings by 4% per press.
②. Long press the global CCT adjustment button to continuously and synchronously adjust the color temperature of the upper and lower lightings at a speed of 20%/s.
③. Press and release the global CCT adjustment button within 1 second, recognized as a short press.Press the button for more than 1 second will be recognized as long press start, and then release the button will be recognized as long press end.
④. When adjusting the global color temperature, the luminaire will automatically operate a power compensation mechanism to ensure consistent brightness at different color temperatures.
2.4 Linkage adjustment
The feature of linkage adjustment can gradually fade the upper lighting to the lower lighting, or fade the lower lighting to the upper lighting as your wish.
①. Short press the linked dimming button to gradually fade the brightness of the uppper and lower lightings by 10% per press.
②. Long press the linkage dimming button to continuously fade the brightness of the upper and lower lightings at a speed of 20%/s.
④. Press and release the linkage dimming button within 1 second, recognized as a short press.Press the button for more than 1 second will be recognized as long press start, and then release the button will be recognized as long press end.
2.5 Overdrive
①. In normal state, when the brightness of one lighting is 10% and the other lighting brightness is 100%, press the corresponding direction of the linkage dimming button again to increase the brightness of the 100% side of lighting, the maximum limit of this side of lighting brightness will be raised from 100% to 150% to enter the overdrive state, and the overdrive indicator will light up.
②. In overdrive state, when the brightness of one lighting is 10% and the other lighting is 101%, press the corresponding direction of the linkage dimming button again to reduce the brightness of the 101% side of lighting, the maximum limit of this side of lighting brightness will be reduced from 150% to 100% to exit the overdrive state, and the overdrive indicator will turn off.
③. In the overdrive state, the brightness range of the overdrive channel lighting is 101% -150%, while the brightness of the normal channel lighting will be limited to 10%.
④. The luminaire will not save any lighting states in overdrive state. When the power is turned off and the light is turned on again, the luminaire will restore the last saved lighting state 15 seconds before entering the overdrive state.
⑤. Only pressing the linkage dimming button can make the luminaire enter or exit the overdrive state by using this remote control.
⑥. In the overdrive state, except for the normal channel which the lighting brightness is limited to 10%, all other lighting controls are the same as in the normal state.
⑦. In the overdrive state, the global CCT adjustment range will be reduced. Based on the different brightness, the luminaire will calculate the global CCT adjustment range in real time according to the color temperature compensation mechanism.
Other luminaire control
3.1 Sensor switch
The remote control can control the on/off status of the gesture sensor on the luminaire. When the sensor is turned on, the luminaire can be gesture dimmed. When the sensor is turned off, gesture dimming will be disabled on the luminaire.
①. Short press the sensor switch button to check the sensor status. If the sensor on the luminaire is turned on, the sensor indicator will turn on. If the sensor on the luminaire is turned off, the sensor indicator will turn off. If not paired or the luminaire is offline, the sensor indicator will not light up.
②. Long press the sensor switch button for 3 seconds to control the on/off status of the sensor on the luminaire.
③. The sensor status of the luminaire will not be saved. When the luminaire is powered off and turned on again, the sensor status will return to the default on state.
3.2 Firmware update
It is support to upgrade the firmware of the luminaire using the remote control by burning the firmware of the luminaire into the remote control.
①. Short press the firmware upgrade button to check if there is available firmware package in the remote control. if there is available firmware package, the firmware upgrade indicator will turn on. If there is no firmware package or an invalid firmware package, the firmware upgrade indicator light will not light up.
②. After long pressing the firmware upgrade button for 3 seconds, the lights on the luminaire will flash once, and the firmware upgrade for the luminaire will automatically process, and the firmware upgrade indicator will start flashing until the firmware upgrade is complete.
③. During the firmware upgrade process for the luminaire on the remote control, long press the firmware upgrade button for 3 seconds can cancel the firmware upgrade for the luminaire.
④. During the firmware upgrade process for the luminaire on the remote control, please place the remote control close to the luminaire to ensure good communication signal.
⑤. Do not operate the remote control and the luminaire during the firmware upgrade process for the luminaire on the remote control to avoid firmware upgrade failure.
⑥. If the remote control is paired with multiple luminaires, the remote control will simultaneously upgrade the firmware of all paired online luminaires during firmware upgrade period.
⑦. Please refer to the next page for detailed firmware upgrade steps.